
To make a fused composition from a pattern I have chosen a simple little design in which I can demonstrate how to use a drawing to create a small work. The original piece is only about 7x10". Using the release paper leftover from the Wonder-Under, draw a facsimile of the quilt pictured. (I added a few extra lines in the drawing, no biggie!)
With a second piece of release paper, trace the shapes of the little tree.
I suggest that you write G on the tracing to remind yourself that the G goes on the GLUE side of the fabric. Cut the two pieces apart, on the drawn lines.
Audition fabric for this piece, using some previously strip fused fabrics
Flip the pattern piece over, as well as the fabric, glue side up, and place the pattern where you want it. With the iron's tip, CAREFULLY fuse the
center of the paper to hold it there temporarily.
Trim the fabric, close to but not exactly on the pattern piece. Never rotary cut through the paper.
Lift the paper off the cut shape and flip it over.
Notice that the fabric piece is just slightly larger than the pattern. Totally correct.
Audition the second piece and again flip it over and tip-press the iron onto the fabric.


Trim the fabric away from the paper shape.
Slip the darker green section under the lighter green section and fuse them together, LIGHTLY.
Trace the area 'behind' the tree shape, bringing the drawn lines in so a small bit fabric will be under the tree shape.
Cut the background paper shape and test that the tree shape fills the void. Again mark the glue side with G's.
Choose a background that will contrast with the tree shape and place the pattern piece on the fused side and fuse lightly. In this photo the Gs are visibly backwards. This is correct.
Flip the fabric over and remove the paper.
Place the background fabric in the spot on the pattern that corresponds. Fuse lightly.
Then trace the shape above that section, marking it as before.
Slide the top piece into place under the tree shape and fuse lightly.
NOTE: While it is possible to just fuse the tree shape onto a background, the lesson here is that there is nothing underneath the tree shape but a narrow edge to fuse it too. In larger works this is more important, but this is an easy way to learn how it is done.
Since the next spot would line up later with the trunk of the tree, I wanted a two color piece, so I lay the pattern on a fused combo of two fabrics. I was more concerned that it lined up with the center of the tree than if it fit perfectly under the background piece. You will see how to cover that gap later.
This is the bottom left section and I wanted a strippy look, so I traced the section, found a plain fabric and added strips, then trimming them even.
I added a turquoise square under the yellow one and then I am ready to trace the outer edge of the composition.
The tracing of the outer edge...
Audition a complex striped fabric to see if it works with what is already created.
Fuse the paper in place, lightly and cut away the excess fabric.

Place the edge piece and fuse it just to the PAPER pattern, not the rest of the composition. This stabilizes the section so more strips can be added to it.
This is when the gap is covered with a fabric strip, hiding the opening and connecting the top and bottom sections, as well as the side edge piece. Trim the outer edge and fill in the top left section with fabric, also striped.
To add the 'tree trunk' cut a straight strip and trim one end to a point and cut the other end on an angle. Place the strip on the join of the tree curving it as you press, and continue it down on the join of the section below.
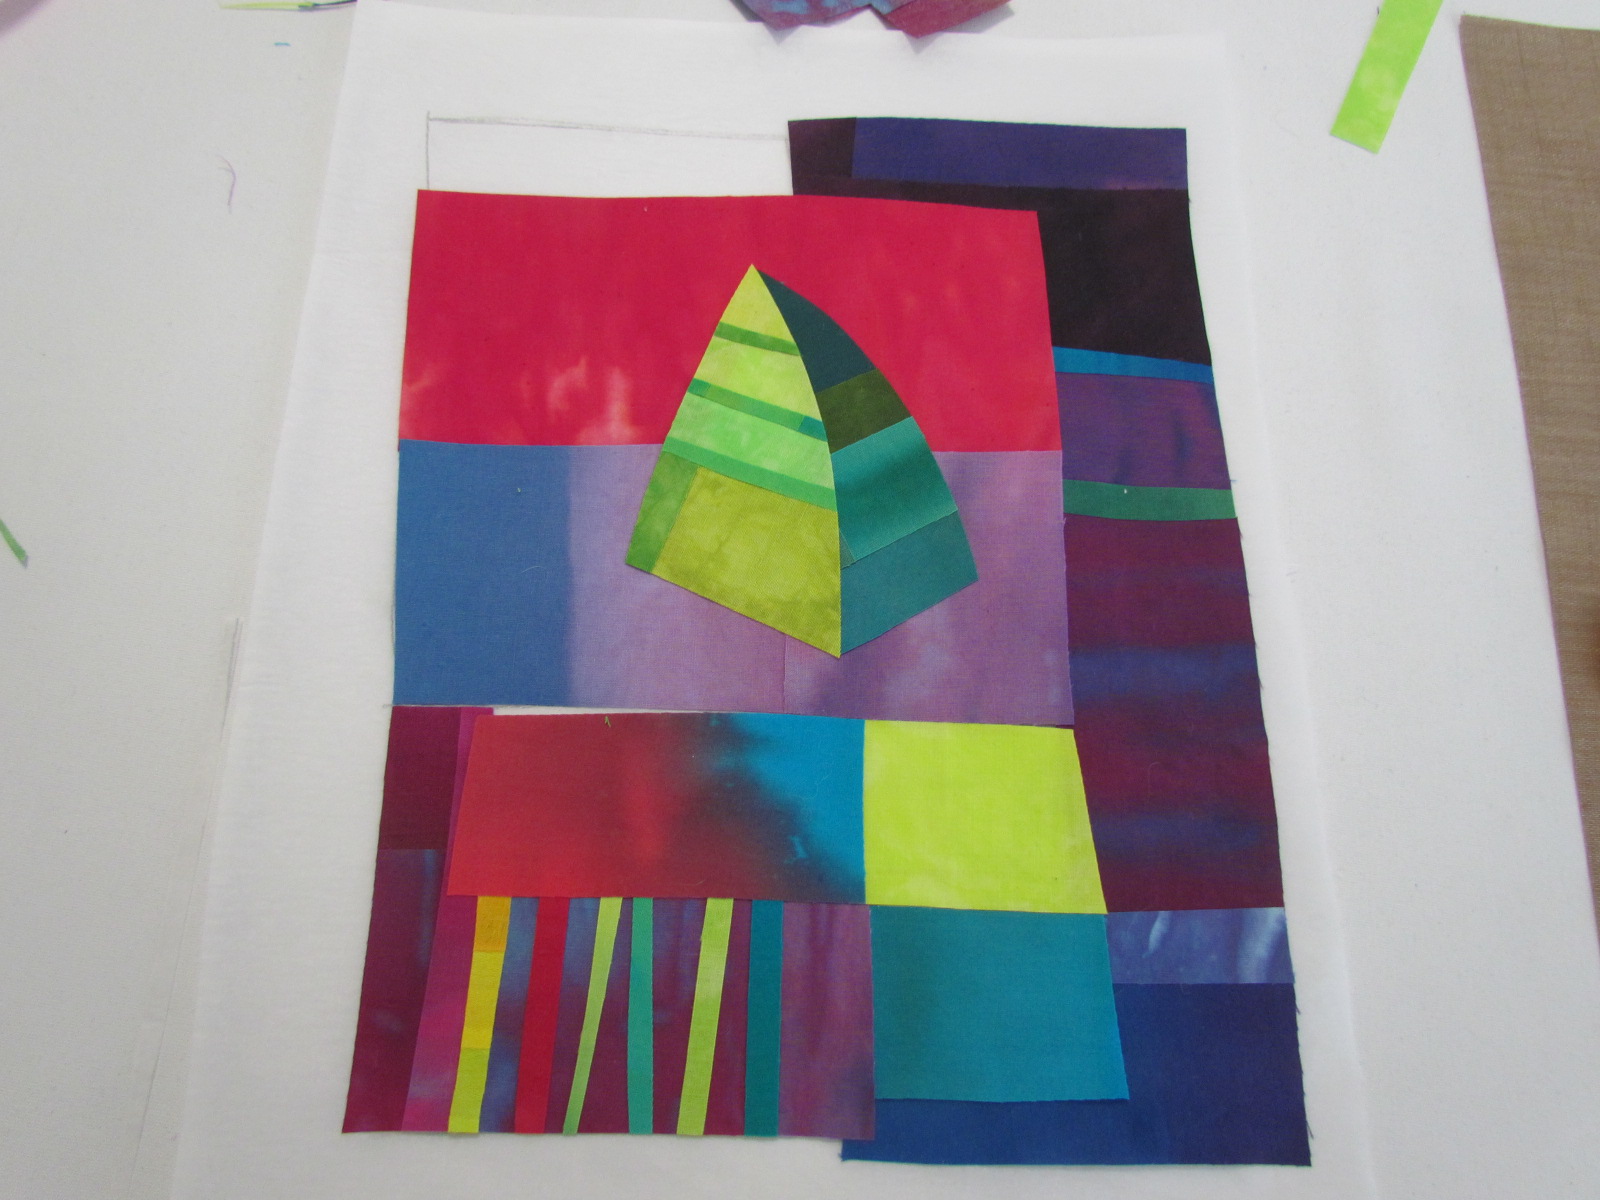
The trimmed composition place next to the original pattern. At this point
dots can be cut and added as the final elements.
This is a good time to fuse the whole design to release paper with more than just a light touch.
Next week we will fuse the composition to batting and finish it with stitching.


 To add the 'tree trunk' cut a straight strip and trim one end to a point and cut the other end on an angle. Place the strip on the join of the tree curving it as you press, and continue it down on the join of the section below.

Wow. Just--wow!
ReplyDeleteExactly what I was thinking!
DeleteYay...this is where it starts really coming together. One question....do you always do all your quilting after all the fusing is done....or do you ever do some in the middle? I understand that you will probably get to that later...but I'm just curious.
ReplyDeleteI consider the quilting the last part of the design process. Everything has to be added so the quilting finishes the work.
ReplyDeleteMelody
Thanks!
DeleteWhat a good lesson. I now understand that I shouldn't toss even the smallest scrap of fused fabric. It was really fun!
ReplyDeleteAgreed! Just when I was finally making myself throw away piecing scraps! Sigh.
DeleteLol.
ReplyDeleteLove how thorough and clear your directions are! Especially that bit about marking the paper with the G to make it clear which side gets glued. This tells us how to execute a design. Will you be talking later about the design step? Any tips about composition?
ReplyDeleteI marked my transfer paper with pencil, then with permanent marker. Both transferred onto the transfer film on my fabric!!! Melody, what is your marking tool?
ReplyDeleteI just use pencil. Why do you need permanent marker?
DeleteThe pencil transferred on to the fusing and showed through the lighter fabrics!
DeleteCharlene wrote:
ReplyDeleteWill you be talking later about the design step? Any tips about composition?
Yes, I will be discussing composition, but what do you mean abut the design step exactly?
Charlene wrote:
ReplyDeleteWill you be talking later about the design step? Any tips about composition?
Yes, I will be discussing composition, but what do you mean abut the design step exactly?
I say 'design step' as another way of saying composing the final piece. Once you have all the parts made, next you put them together, designing or composing the whole. I'm really looking forward to that discussion.
ReplyDelete