Friday, September 30, 2016

Assignment #2: Simple Block in Two Colors and Three Sizes


Only two people did the assignment. Was it too difficult or too boring? Did the dog eat your homework? 
I am extending it for another week, so let's see something from the rest of you!

Beginning with LuAnn's composition. The one on the right is the finished piece but the one on the left is the work in progress. 


I am showing both because I think the unfinished piece is just wonderful as it stands. Very strong and direct and dynamic. The added borders on the other view don't support the finished work and are sorta gilding the lily.
If I saw the unfinished design (finished of course) in a gallery I would think that this artist was saying that this is just what she means to say, no filly fally.
LuAnn says she is a more is more gal, but her idea was original and looked great with no added extras.

Mary Ann made this piece and in her blog she discussed her frustration. In my opinion she got in trouble with the print. Had this been all solid color it might have been obvious that she needed more variety in scale and more elements (blocks) to repeat. The dark lines of the framing separate the elements and break up the design rather than make it cohesive. The strippy panels work as a more interesting element and perhaps they could have been the simple block.  Still it was a good try.


Thanks to LuAnn and Mary Ann for being good sports and doing the assignment. The rest of you are not off the hook. Send me your designs at fibermania at g mail dot com.

Friday, September 23, 2016

Assignment Results


 Your assignment was to create a composition that could best be done (sensibly) by fusing.

 Kinga Soni made this composition before the assignment was announced, but I felt I had to point it out to you as an example of taking the essentials and using them ALL in a wonderful whimsical piece. Note the background curves echoed in the round posies, and the curving stems also following the curve. This is a great example of reiteration of design elements. Also the lovely strips top and bottom which overlap the edges, a trick fusing is so good at doing. A few wonderful dots and leaf shapes, plus strip pieced wavy lines, and swoon...hand embroidery.
Well done!
 Susan Turney used a gorgeous Southwestern palette for her floral piece. The intricate scissor work is just the sort of thing that fusing does so well. She also made use of curved sections and highlighted them with beautifully elegant quilting. This is a perfect example of letting the fabric do the work for you, as well as less is more. A quilt worthy of hanging in a gallery.

LuAnn Kessi made this asymmetrical work, using wavy borders, (nice!) and lots of skinny lines on the side panel. People will wonder if she pieced those squares, but we know better. Great use of primaries, and of course a central stack under the intricately cut leaf shape. This is not her first rodeo.

 
MaryAnn Shupe jumped right out of the box with her woven strips piece, including photocopied muslin calligraphy, fuse-wrapping a canvas with fabric and adding a fused circle and a button. This is only 5x5". She shows step by step how she did this on her blog:  http://joyfulputtering.blogspot.com/2016/09/dwell-in-possibility.html
I am way impressed. 

Thank you for your great work and now for the next assignment. 
Design or choose a simple block, using two colors (you may use multiple values of the same color) and make it in small, medium and large, and use it in a composition. Again, email me your photo to fibermania at g mail dot com.
Best Wishes.


Thursday, September 15, 2016

Focus on Fusing: Intermediate Lessons

Sale on Wonder-Under online only:
http://www.joann.com/pellon-805-wonder-under-interfacing-by-the-bolt/13188735.html
Designed and made by my sister Brooke Larm:
Brooke Larms'  fused quilt Cell Theory

My sister and fellow fuser,  Brooke Larm and I had a discussion of where I will be taking the class now that the fundamentals have been taught. I wanted to just let you go free to devise your own designs and experiment. But I know a bunch of you want to continue to have assignments of some kind, so what should those be? We came up with a list and I am back on the bandwagon to continue to provide some structure to the class by suggesting ideas and challenges.
Last week Nancy asked:
As for design principles, could you talk a little bit about negative space, i.e. maybe percentages of busy vs. areas of eye-rest in a composition? How does color play a part in achieving a balance? Do you look at areas of a composition and think, now I need something dark in this corner, or something bright opposite this side, to balance? How about motifs – ever need to balance those?
My answer:
I never think of things like that,which sound like rules to me,  so if they are important I guess I have managed a career in art without consciously considering them. I look at the thing I am making and evaluate what it says to me.
This is strictly a personal way of working and you must find what works for you. Your style will emerge from trial and error and seeing the results of what you have tried, in a body of work. 

There are no rules in art that one must keep in one's mind as one creates. If rules made great  
art then art would become formulaic and boring. Let go of worry about rules and just play. 

To begin, ask yourself why fuse? Some of my answers are listed below.
Why fuse?
Fusing is a fast way to get my ideas out of my head and into reality.
Fusing allows all shapes to be part of my design vocabulary.
I can change my design by easily peeling up a part that doesn't work, rather than unsewing it.
Details can be added to enhance my design.
I love the fused finishing techniques for mounting and hanging work.
Fusing works for both pieced looking and appliqued looking designs.


Your assignment is to create a composition that could best be done (sensibly) by fusing. Any size you like.
Send me a picture of your finished project and I will try to feature it on the blog next week, pointing out the way you have used fusing to aid in your design. Not a critique, but examples to help everyone.
My email is fibermania at g mail dot com. 

Friday, September 9, 2016

Fusing Q & A

Nancy had a boatload of questions, and I am happy to answer them here for all. My answers are in blue.

Hello Melody,
I have been plugging away at our assignments, having just finished our composition and design project.
 I will continue with our projects, but wanted to ask a few things before you’re done with us.
Little tree project, fusing from a pattern: I did this “easy” exercise because it was the assignment for the week, and the process brought up many questions.

I penciled a “G” for glue side as suggested, but that G and any other lines that I did not fully erase during sketch transferred onto the web side of the fabric and showed through lighter colors. Suggestions to avoid this and still know what side you’re working on?

If you are working with a light color, don't write on the pattern piece. Just pay attention to the shape and fuse/cut it.

As I cut individual pattern pieces, I added a 1/8” or so margin all around. As I added other pieces, those seam ended up messing up my original design. Do you add that seam allowance only to select pieces or select edges of pieces as you go along to keep to the original pattern? 
Yes.
Do you look at a piece before you cut and determine “this edge over, this edge under” and cut accordingly?
Yes.
(Contrast, contrast, contrast. I thought that your sample looked great, but my little tree was kind of lost in the background. Had no pop to it. I know I need more dark hand dyes, but any other tips to color/value selection?
Simultaneous contrast works in most cases. Opposites on the color provide that, even if they are lighter values.You could have switched out your background colors to make the tree stand out more. Thinking ahead is always a good idea.
What size stitch do you usually use for quilting? When you get to a corner or point, do you lift the foot and manually insert the needle to be right on the point or corner?
Yes, sometimes. I like a longer stitch length, 3.0  usually.

All threads are just brought to the back and left as tails, no knotting?
My machine has an auto thread cutting button which pulls the threads to the back and cuts them. I manually stitch in place about 3 times to secure the threads then press the button. I use a self threading needle to pull the starting thread through to the back. No knots.

Still having trouble with using release paper -- we simply are not friends. As I commented in an earlier post, I have found fusing success only in removing the webbing entirely from the release paper and fusing it from the right side of the fabric, backed by a Teflon sheet. I can continue with the extra steps for this, but I sure would like to know why fusing directly from release paper works for some and not for others. Even had trouble with a piece bunching up when doing a final fuse to release paper at the end of a project. It did relax when pressed to batting.

As mentioned in a previous email to you that there are many variables when it comes to the initial fusing. How hot is your iron, how long are you pressing, how cooled down is the piece before trying to remove the paper, etc. If I were with you in person I might be able to tell what is happening for you, but just let me say that it is not uncommon to have trouble when you are in a hurry or already stressed by life. I have been there. When I am out of creative ideas, it is time to fuse new fabric, and dream about the possibilities.
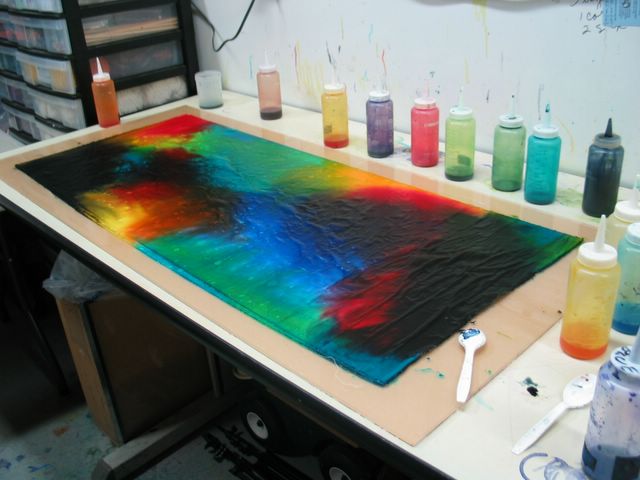
As another participant recently commented, one of the things that make your pieces so wonderful is the use of your flat dyed fabrics that fade from one color to another. My last attempt at creating these fabrics was a failure, at least not what I was going for, and I’m about to embark on a new dye session, especially to include the darks my collection is missing. Any suggestions for avoiding this look? (colors are off with photo, think blue-purple-red)

http://lazydyer.blogspot.com/ has all the things you will need to make the fabric I use. The missing info is that I put three layers of fabric on the platter (now I use styrofoam insulation sheets cut to 24x48") and pour on the dyes. working out the bubbles with either my gloved fingers or a plastic spoon. The fabric you use makes a difference too in the final outcome. I use mostly bleached mercerized print cloth or bleached muslin. Not pimatex or poplin. 

As for design principles, could you talk a little bit about negative space, i.e. maybe percentages of busy vs. areas of eye-rest in a composition? How does color play a part in achieving a balance? Do you look at areas of a composition and think, now I need something dark in this corner, or something bright opposite this side, to balance? How about motifs – ever need to balance those?
That is impossible to discuss without samples, so let's leave that for next week.

Trust me to continue our exercises, though I’m lagging behind a bit now. (My last exercise sat on a surface in the quilt room for over a week and I rearranged it every time I walked through the room – there’s certainly something to be said for spontaneity).
If we do not continue the class formally, let me thank you now for sharing all this knowledge, and for allowing us to use your original designs as a stepping-off point. Several years ago you gave me permission to practice using designs like yours until I found my own “voice” and I think that’s a rare and generous thing for an artist to do. I’ve been following you ever since I first figured out what a blog was – no idea how I came to fibermania, but I’ll never forget the thrill of seeing your work and getting to know you. I know you were still in Chicago at the time, and I read backwards from there. I still refer to those posts from time to time.
Thanks for all,
Nancy Albright

Friday, September 2, 2016

Happy Holiday

Due to the Labor Day weekend, there will be no lesson today. But start thinking of questions you may still have and let me know what you need. We are nearing the end of this class and I want to make sure you have everything to move forward.